3D Engine Update 3: Shading improvements

So over the last week or so, I restructured my 3D engine. Nothing that would be visibly noticeable, but I feel better about where it is at right now. What I like about it, though, is that it is still not what would be probably considered “the right way” to do it. The reason I am happy about this is that it makes it my own, and I understand exactly why and how it works. Once I have a really solid understanding, then I can move towards doing it the “correct way,” but for now, my little hacked together experiment makes me happy.

One of the changes I did make is to the shaders. I added a PseudoGouraudShader, which uses gradients to draw each polygon face to try and smooth out the hard lines created by using a flat shader. I doubt this method would ever produce 100% accurate results that are identical to a gouraud shader, but it makes for interesting results. The method I am using is pretty slow, as it needs to draw each face four times, three of them being gradient fills. Each vertex’s normal is calculated from the sum of all the faces it is a part of, and that brightness value is used to draw a radial gradient on that face, the center point being the vertex. (Two examples: RGB example and dot example, the circle areas are ‘painted’ on via gradient fill) This can produce some fun effects too when played with.

I had an example of the PseudoGouraudShader last week, but it was off, it looked like alternating faces had different brightness values. Just playing around last night I found the issue, it lies with how I was calculating my normal.  When getting the cross product of the vectors, it is better to normalize the result instead of normalizing the vector before. The example below shows the two results and code snippets:
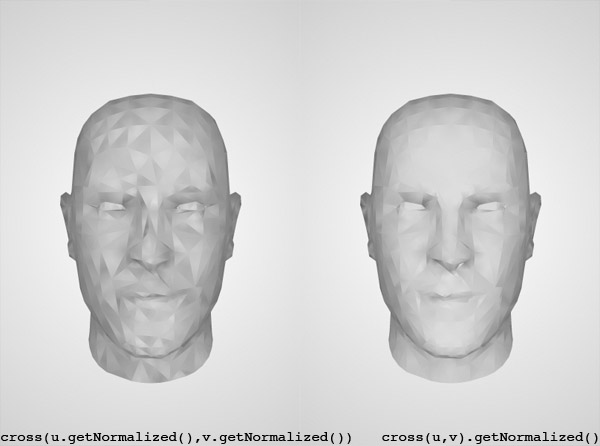
normalized-result

Still not perfect, but I’m not sure how close I can get using this method. I think there might still be some slight errors in the core math, which could be producing the results that look similar to the image on the left (although less intense). You can check out the live demo here.

On a last note, calculating normals and centroid over and over again for rendering can get pretty intense. In the case like this, the same normal gets calculated multiple times a render even though it hasn’t changed (because each vertex needs to get the normal of each face it is connect to). In order to boost speed, I created a caching system. When the normal is calculated, it saves it to a “stale normal” and updates an object (which I called the cached face) that tracks the position of each vertex in the face. Then, the next time the normal is called, if that cached face is not different then the real one, it just uses the stale normal instead of re-calculating.

3D Engine Creation pt 2: Lighting & Shaders

3d-engine-banner-part2

Quick update on my current experiment building a 3D engine in Flash – I’ve added light and shaders. Shaders are special materials that are effected by the direction each face is pointing (called the normal) and another vector, in this case, a light direction. During the render process, each face calculates its brightness thus giving the illusion that light is reflection off of the mesh.

Upon researching, I found on a few occasions that the way to calculate lighting is to simply add the normalized normal and normalized light vector. This, however, seems to be slightly incorrect applicable to this situation. First, the result is another Point3D, where instead I am looking for a brightness value. Upon consulting coworker Mathieu Badimon, he suggested using the dot product of the normal and light vector. This returns a single number value, and when used to calculate brightness seems to work perfectly.

Next step? Finally tackling bitmap distortion in 3D, allowing for bitmap materials. (Which opens the doors to different types of shades as well, such as bump maps and dot3 normal mapping.) Once I’ve tackled that, I plan to completely restructure the engine, as I have a better idea now of how it can work while still sticking to my original plan of excluding a view3D. In the process of restructuring, I plan to write up the core math equations used in the most simplified way that I can, as finding some of these equations in a non-language specific explanation or simplified manor can be difficult.

Check out the new demo here. Click and drag the white dot to move the light source.

Creating a 3D Engine in Flash

3d-engine-banner-part1

A few weeks ago I had to create a simple X-axis based parallax ‘engine’ for a project. Just basic horizontal movement, which is scaled based on an abstract z value. Well, somehow that turned into a full 3D engine. So I am continuing to build on what I had started in order to create my own Flash 3D engine, not because I think I can build a better Papervision, Away3D, or Five3D, (because I’m sure I can’t) but rather in order to learn. Since I end up using 3D engines fairly often now, I figure it’s good experience for me to build my own and see how it can work from the ground up.

Continue reading “Creating a 3D Engine in Flash”

Working with Away3D

So for the last few weeks I’ve been experimenting with Away3D. Away3D is a free 3D engine for Flash, very similar to Papervision3D. As a previous user of Papervision, I noticed a lot of similarities,  but there are a few differences, both good and bad, to take note of.  There are different features between the two, though for the most part they’re pretty similar.

Continue reading “Working with Away3D”

Sport Chalet: The Mountain

sc_banner.jpg

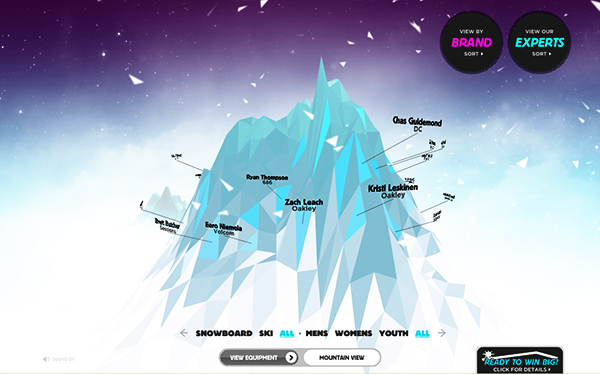
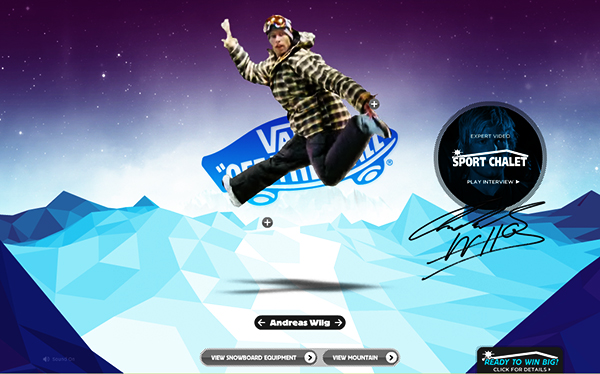
So I just recently finished up a micro site for Sport Chalet, a California/West Coast based sporting goods boutique. Sport Chalet came to Firstborn wanting to promote their winter line of snowboarding and skiing equipment and apparel. To help, they also got a bunch of professional snowboarders and skiers to help promote the site by modeling with equipment and by giving interviews. Our goal was to figure out a way to display all these professionals as well as just models in an interesting way. The concept we arrived at was to create a 3D mountain and populate the face with hot spots that would represent one of the sixty or so people. After selecting a person, the user is taken to a ‘rider page’ that has motion tracked video with target points that describe what that person is wearing.

The first challenge was to create the mountain in 3D in Flash. Originally we were going to create the mountain based off of a grayscale depth image, where the height of the 3D mesh would correlate to the brightness value. However, this did not offer us as much controll over the final result of the mountain. Instead, we decided to model the mountain in an external editor and bring it into papervision. Our first inclintion was to use collada or md2 format. However,  I was unsure of how much accessesability I would have to the mesh, as we would need to make it interactive. In fact, since each triangle would be it’s own object it could not be appart of one mesh, so rather the mountain would be a collection of independent objects. Additionally, the art director was using Cinema 4D which at the time did not support collada export. So it seemd to me that the only option left was to make my own importer from Cinema 4D. The importer I created uses VRML files (.wrl) which are ascii text based files that contain an array of point and faces, as well as UV coordinates for texturing. It’s actually a simple process to rebuild all mesh, except for a few tricks such inverting the Z-axis (papervision’s is opposite to Cinema’s) and reversing the normals since they all come in backward. Since I wrote my own importer, I knew exactly what was happening, and thus had totally controll over how the polygons are created and handled, therefor making the interaction process that much easier. Here are a few steps/examples of creating the mountain:

Example 001:  Bringing the object in directly from Cinema (the color is from its original material) and showing the wireframe as well.
Example 002:  An example of adding a bitmap texture to the object and have it retain proper UV coordinates.
Example 003: Adding a color gradient based off of each triangle’s centroid position relative to the entire mesh, as well as cropping polygons on the lower portion to remove the rectangular base
Example 004: Adding some effects such as Flat Shading (which had a bug that I needed to fix first) and subtle glow.

Another interesting process was creating the tracked videos. The site contains 78 tracked videos, which for each we needed to do the keying, color correction, and finally motion track each one. After each video was tracked with one or several trackers, we simply copied the keyframes right from after effects and ran them though a custom parser we built to convert them into XML. You can see the result on the site or in this demo.

So please check the site out, hopefully you’ll enjoy it, as it was pretty fun to make. There’s a contest you can enter as well, but you have to be able to get to one of the Sport Chalet stores, and they’re only located around Southern California / west coast area.

sc_1.jpg

sc_2.jpg

Exporting Cinema4D Objects into Flash

I developed a way to export an object from Cinema4D and bring it into Flash with FIVe3D. Since I am using FIVe3D, the object comes in as vector, and not as bitmap. Currently I haven’t done anything with texture, but I would like to try and preserve color data for each polygon. I figure, if you want a bitmap image instead on a complex polygon model, you might as well just use PaperVision3D.

The export method was the trickiest part, or rather, just finding which format works bes. It seems that VRML will give you all the data you need and formated so that I could understand it. The two important exports are an array of 3D points which look like: [ 0 6.794 0, 13.385 6.794 0, 42.833 6.794 0, 72.281 6.794 0, ] for however many points you  have, then another array of face sets that looks like [ 0,1,42,-1,1,2,43,-1,]. The face set is instructions on how to connect the points. So in the previous example, the first polygon (which is a triangle, so you’d need to triangulate before export) is starts at the first point (0) then connects to the 2nd point (1) and finally the 42nd point (42). The negative one must be for another use, so currently I ignore it when I parse.

Anyways, here’s just a simple object I exported and took into Flash: Bottle

Continue reading “Exporting Cinema4D Objects into Flash”

Depth of Field test

I want to start posting some of the little experiments I’ve been working on at work. I did an experiment trying to optimize depth of field rendering in FIVe3D. The way you can have 500 objects in 3D space with depth of field blur on all of them and still have decent performance is to use smoke and mirrors. Basically, the objects are not being blurred. Instead, before the program runs, it takes the Sprite or Bitmap that is to display, and draws it and saves it as a bitmap. Then, it applies a blur to it and redraws it, and saves it as another bitmap and stores it away, then blurs a little more and so on.  So, at the end, there’s an array with say 20 or so images with different states of blur on them. Then, based on the perspective of the objects, I find out their distance from the camera, and generated a value of how much to blur the object. But instead of blurring it, I just swap out the current bitmap with the applicable pre-blurred image. If you want to see some really cool depth of field stuff, check out some of the experiments by Mr. Doob.

dof1.jpg

click and drag to rotate, mouse wheel zooms in/out

More FIVe3D experiments

Here’s two more experiments I recently did with FIVe3D. This first one here is taking the image depth analyzer and is extending it to generate a 3D mesh instead. (I added the option to turn off the stereo rendering help performance.) The next test was something I did for a potential upcoming project. I’ve been meaning to get back to my “Flash Roots” (no pun intended on the ‘root’) and visit my first Flash project ever – a game called Super Josh. One way or the other I am going to start working on a new version, which would technically be the fifth game even though most of them never got very far. Anyways, here’s the Super Josh FIVe test. Basically, I can use FIVe3D to render the environment and use pre-rendered sequences from Cinema 4D for more complex geometry such as characters. The idea for this is based upon many games that have done this before, the one that stands out the most to me is Mario Kart 64.

Speaking of 3D, here’s another test I did back in college using the BitmapTransform class with tracker points exported as XML from After Effects. The BitmapTransform class just deforms an image based on four target points.

Anaglyphic 3D Rendering in FIVe3D

 So since Mathieu Badimon, creator of FIVe3D, sits right behind me at work and we’ve been working on a project together, I figured I should give his 3D engine a try. In case you aren’t familiar with it, FIVe3D is a light, simple, 3D emulator for Flash. However, don’t confuse it with PaperVision. If you want full modled polygons with textures, lighting, shadows – basically full 3D, then that is where PaperVision is your tool. But if you need simple 3D rendering, and you don’t want to import a million classes and compromise performance, then that’s where FIVe3D comes in to play. Mathieu does a pretty good job at showing off it’s uses on his LAB site.

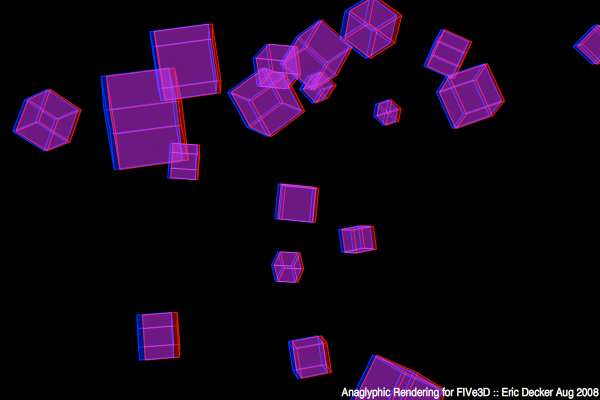
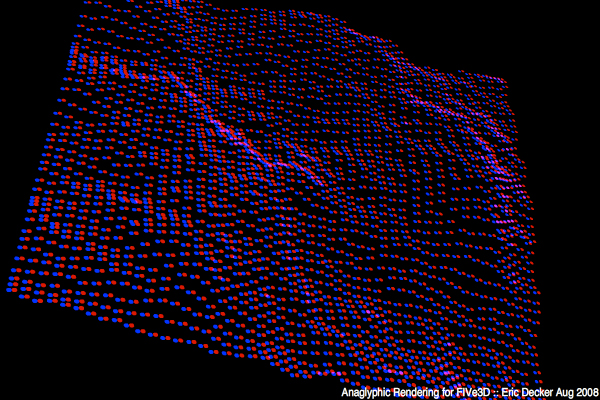
So back to what I’ve been up to. I’ve always been interested in doing niffty 3D stuff with Flash, so getting into this was right up my ally. One of the first things I did was extend the engine to render stereographically, as where you would be wearing those old time 3D glasses with the two different color lenses. With the FIVe3D classes, I’ve extended the Scene3D class, so instead of Scene3D you use AnaglyphScene3D and it will display the result for use with 3D glasses. So anything done with FIVe3D can be dropped into it and it should work perfectly. It’s set up so the user can change the offset of the two perspectives, as well as show the original rendering. I still have to tweak the way it applies all three together as right now it blows out the original image’s colors. Keep in mind too that in order to get the stereographic effect, you need to render the scene twice, so if you’re showing the original image as well then you’re rendering 3 times, and that can make the performance take quite a hit.

Anyways, here are two examples of what I’ve done with it. This first test just shows a bunch of cubes in space, but it runs pretty smoothly, even on my old G4 PowerBook. This next test can be pretty heavy, so be prepared for a browser crash if your computer is weak of heart. This depth demo takes a grayscale image and converts it into points with a z-depth based off of the brightness value. I’ll do some more with it, and will probably post some more test within the next few weeks.

example1.jpg

example2.jpg

Motion Tracking Experiment #2

Another clip playing around with SynthEyes, Cinema 4D, and After Effects. I can’t seem to get the GI to stop flickering, even though I have it set to ‘camera animation.’ I might have to upload a saved solution file or something to netrender. Additionally, if you’re having a problems recently with After Effects not rendering out due to a permissions error, you need to update QuickTime to 7.4.1 or whatever the new one is. They also cut out a lot of codecs, but as long as H246 is there I’m good.