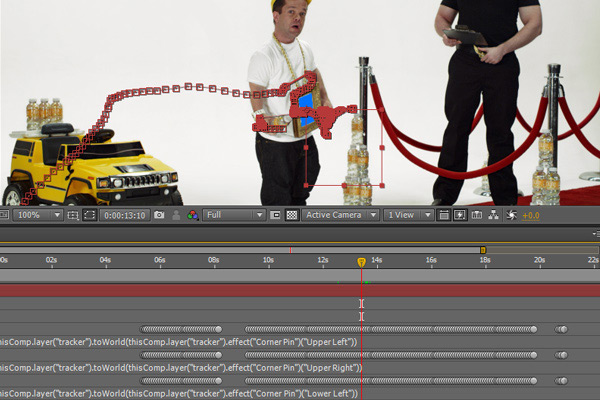
It’s been almost a year exactly since my last update. I guess I’ve been pretty preoccupied. I wanted to do a post about an age old problem very often encountered in Flash – compositing video so that overlaying elements sync perfectly with a video. In essence, getting the true current frame of an FLV or F4V. Specifically the problem I want to talk about tackling is having an image be composited as if it were in the video. I think a great example of this is a site we (as in Firstborn, not me) did for 5 React a year or so ago. There are a couple of solutions to solve this problem that work almost perfectly 99% of the time. In general, they usually involve an XML file that contains corner points for each frame of how an image should be transformed to match the video. For live video (no CG) tracking is set up in After Effects and then the cue points are exported. While After Effects doesn’t have a native export cue points as XML option, the keyframe data can be copied & pasted out as plain text, and then you can just run a simple RegEx to convert it to XML. This is all pretty simple and isn’t the problem, the issue lies with not being able to get the exact frame that a video is displaying.
Category: Video
Time Displacement Experiment (part II)
I made some updates to my time displacement experiments. I lumped them all into one nice little app, as well as give some options to toggle the effect. I also added the option to choose video source, so it doesn’t have to be with a webcam anymore. I added the option to tint what area is being effected, as well as experimented with frame blending to try to lessen hard edges. Like the previous post, I’m still using Pixel Bender to apply the displacement.
experiments.eric-decker.com/time_displacement

More Time Displacement Experiments: Now with Pixel Bender
I decided to try using Pixel Bender to do the time displacement in the recent experiments I’ve been doing, as I was hoping it would perform better. It actually seems to, but there still is a significant lag. However, I’m pretty sure this is because of having to make a huge sprite sheet first.
I basically make a huge sprite sheet of all the frames I have saved. Since Flash 10 lets you have bigger bitmaps (16,777,215 pixels total, max dimension at 8,191 src) I can create a large image that tiles all the frames I currently have saved. I can have a max of 12 frames across (at 640) and 4 frames down (at 480). So after I create/update this giant bitmap, I send it to a pixel bender filter that is currently applied to a gray scale image. The Pixel Bender filter then looks at each pixel, evaluates the brightness and interpolates it to what frame it needs to update from, then replaces the current pixel with the appropriate one from the selected frame.
These experiments are still a little rough, but I’ll post ’em anyways. No videos yet, I need to find some time to do screen recordings. The ticker is obviously by Mr. Doob. You’ll need a webcam for all of these, sorry.
- brightness: Displacement based off of brightness of current frame.
- movement: Displacement based off of movement (difference between frames)
- painting: Displacement based off area pained by user, as in previous post (inspired by Smudge City).
- noise: Displacement based off of perlin noise.
- filmstrip: Displacement based off of titled blocks.
In any of these experiments, you can right-click to show the source that is controlling the displacement.
Video Time Painting Experiment
I started playing around with doing some experiments with video and time delay. When showing the previously mentioned JPEG video experiment to my coworker Roushey, he mentioned how just the effect of the time delay was interesting. I was thinking about neat things to do with, and the first idea I had was to offset each frame as one row or column of pixels. So in a 640 x 480 video, the left-most column of pixels would be from the current frame, and the last rightmost column would be from 639 frames ago. The experiment is live here, and there’s a video of it on YouTube.
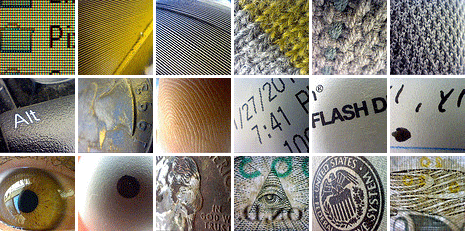
‘Encoding’ Video as JPEG real time in AS3
A few days ago I was thinking if there was a way to reproduce the effect of JPEG compression real time in flash. I figured the best way would be to literally encode the image with the native AS3 JPEGEncoder class. The problem there was that the returned ByteArray could not be interpreted as an image anymore. However, the Loader class does allow for loading a ByteArray and converting it to a Bitmap. And luckily, the loadBytes method let us load the ByteArray right from Flash (as opposed to having to save out a file and load it externally).
Continue reading “‘Encoding’ Video as JPEG real time in AS3”
Webcam Snapshot Tool
Every once and a while, I find that I need to just take a quick snapshot with my webcam at work. Since I’m on a PC, so I don’t have Apple’s pre-installed Photobooth app, or any other simple program (that I’m at least aware of). I also didn’t want to install any bulky 3rd party software that might come with the webcam that I’m using, since all I need in order for it to work is the driver, which more or less Windows installed all by itself. Photoshop has an option to capture from webcam, but the util is pretty limited as it only lets me capture a very small thumbnail size image.
Video Processing Tests
Recently I did some playing around with video and thresholds, mostly just for fun. I first experimented with just changing the threshold of the video, essentially converting it to black and white. Then I tried comparing the current frame threshold and the previous frame threshold to get the difference. The result looks like an outline/edge effect. It’s an interesting way to visualize movement. Then, just for kicks, I decided to display the previous comparison and the current one, colorizing the current difference as red and the previous as cyan. The result is a very pseudo-3D outline effect. This fake 3D technique can also be applied to to straight up video, showing the previous frame as cyan and the current as red and screening the two. Since this all based on movement and the idea that objects closer to the camera appear to move greater distances due to their perspective, it’s very easy for it to display incorrectly.
Check out the first demo. You’ll need a webcam. Click on the video to change the mode, and the two scroll bars control the threshold level and amount of blur applied to the video before any image processing.