So for the last few weeks I’ve been experimenting with Away3D. Away3D is a free 3D engine for Flash, very similar to Papervision3D. As a previous user of Papervision, I noticed a lot of similarities, but there are a few differences, both good and bad, to take note of. There are different features between the two, though for the most part they’re pretty similar.
The different is mainly in the syntax of how things are set up. As with Papervision, you need to set up a Scene3D, a View3D (Viewport3D), and Camera3D. Papervision requires that a Renderer is set up, where as with Away3D the rendering is done just through the view. The syntax is shorter for this in Away3D, as Papervision requires you to pass multiple objects: renderer.renderScene(scene, camera, viewport), where Away3D you just call view.render().
Another difference is that Away3D uses what they call initObjects, which are objects that contain name-value pairs. So when creating a plane in Papervision, you do so by: myPlane = new Plane(myMaterial,350,350,3,3), where there are explicit arguments for the material, width, height, subdivisions x, and subdivisions y. Away3D, on the other hand, doesn’t require you to pass any arguments when you create your plane: myPlane = new Plane({material:defaultMaterial, width:350, height:350, segmentsW:3, segmentsH:3}). This style has it’s pros and cons, the nice part is that when creating the object, you can set specific properties without having a long list of arguments in the constructor. The downfall is that if you are not carefull, it can fail silently due to typos or by accidently calling a property by a different name, such as something like: myPlane = new Plane({segmentsW:3}) vs. myPlane = new Plane({segmentsX:3}).
I’m not going to go though all the differences I encountered, but there are more, and I think it boils down to personal preference. For example, when creating shaders in Papervision, you need to pass a specific light object to the material in order to make it work. In Away3D, as long as the light is in the scene, the shader will use it. Another nice feature Away3D has, which I’m not sure if Papervision has, is material caching. When you have multiple objects in a scene, if the object doesn’t move and the camera doesn’t move, that object is not updated on render. If there are objects that are behind the still object that are moving, those will be updated, but the still one will still not be. There’s an example of that here.
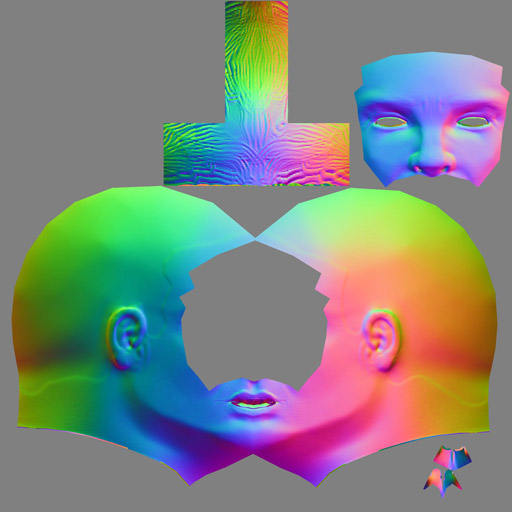
One of the features that Away3D does have that Papervision3D does not (yet?) support is Normal Maps. Normal mapping, basically, is where you take a high polygon mesh and save out the details as a special material that can then be used on a low poly mesh to make it appear to have the higher count. The normal map is basically like an advanced bump map, but instead it is in color because it takes into account angles for where the light reflects and cast shadows. I’m not going to get into details, so check out wikipedia if yo want some more info. Here is an example I made that shows the difference between regular bitmap material and the normal mapping shader, as well as an example that shows you what the normal map looks like wrapped on the head as a texture. The model was made by my talented 3D coworker Andrew Jerez.

One issue with the normal map shaders in Away3D is that once you have multiple objects together, if those objects intersect, the render engine breaks and causes artifacts. There’s a few solutions to this. In the example above, the eyes are a different object/mesh. By assigning them to their own render session ( eyes.ownSession = new SpriteRenderSession() ) and then offsetting their z-depth ( eyes.screenZOffset = -10 ). This more or less will break the z depth sorting, so it can’t be used for complex geomety that would wrap around the object that uses the normal mapping. The other solution, which is best especially if you want more than one object to have normal mapping shader on it, is that all the objects in the scene need to have the same shader material. So for instance, (not seen in demo) we have the head mesh and a hair mesh. We want both to have normal mapping, so we have to assgin the exact same material to each:
shader = new Dot3BitmapMapterial(textureBitmapData, normalsBitmapData);
headMesh.material = shader;
hairMesh.material = shader;
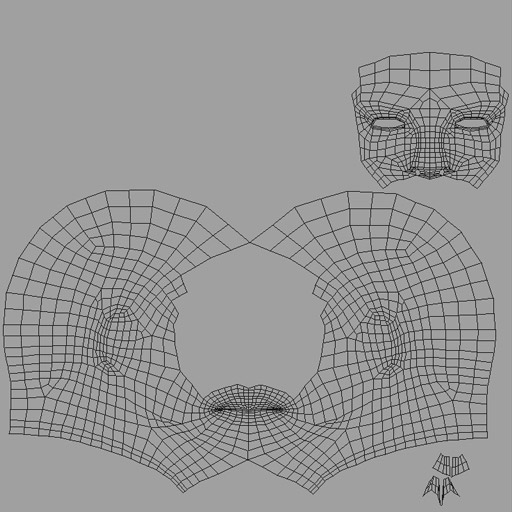
This technique means that you need to make sure that you set up yout UVs in the 3D editor (in this case Maya) so that each object can share the same texture file. Below are some examples showing the texture image, the normal map image, and the UB layout for the face and hair.


Normal maps also take some time to parse and since this happens in a for loop, if you have a large normal map, Flash can freeze for a few seconds while it runs though and creates the normal map. I broke this part out into an enter frame, which on completion dispatches a MaterialEvent. If you are interested, the source is here. Create the Dot3BitmapMaterial as normal, but pass manual:true in the initObject, add a listener for MaterialEvent.DOT3_MATERIAL_BUILT, and then call myMaterial.buildMaterial().
One last fun little thing. Away3D also supportes enviromental shaders. An enviromental shader is more or less like cheating to do reflection. You have a material on the object of the surrounding enviroment, which acts as the reflection result. An example of that is seen here on the Away3D site. The area being reflected is what is in front of the object, which is out of view of the scene and more or less “behind you” as you look at your screen. So a true reflection would be reflecting what’s really in front of that object, which in this case is you looking at your monitor. So hook up a web cam, capture that feed as a material, and there you have a ‘mirror’ material.
If you have a webcam, take a look.

If your camera doesn’t work, you might have to right click>settings, and on the camera tab change it to use the web cam. I’ve noticed this problem on macbooks. It’s slower, but you can also combine materials, such as the environment shader and Dot3Material.
For help with Away3D, visit the dev group they have set up on Google. The Away3D team regularly checks and provides the most help they can.
oh man u forgot one of the most important things, one that definitly makes u choice away3d, and it is that the Qrender in paper SUCKSSSSSSS, combine it with clipping and culling and a little of collada, and u wont get any picture on screen, thats when u see if an engine is superior to the other, besides as u said i dont need to refresh anything i can have around 7k poly and it still moves smooth in away, in paper is alway kinda laggy, i have used both and i sincerily will wait for PVX. BTW good article very impartial and goe to the facts. I’ll try to replicate the enviroment via camera :p
interesting, I’m guessing by Qrender you’re talking about the Quadtree rendering, right? I’ve only tried it with Away3D, and while it defiantly works, it was dropping my frame rate to literally something like one frame per 5 seconds, but that was with over 2,000 faces. So unfortunately for our current project we can’t utilize it. I haven’t tried it with Papervision yet so I can’t compare them, but I do know that the Papervision one was ported from Away3D.
how to add a HotSpots on panoview