So over the last week or so, I restructured my 3D engine. Nothing that would be visibly noticeable, but I feel better about where it is at right now. What I like about it, though, is that it is still not what would be probably considered “the right way” to do it. The reason I am happy about this is that it makes it my own, and I understand exactly why and how it works. Once I have a really solid understanding, then I can move towards doing it the “correct way,” but for now, my little hacked together experiment makes me happy.
One of the changes I did make is to the shaders. I added a PseudoGouraudShader, which uses gradients to draw each polygon face to try and smooth out the hard lines created by using a flat shader. I doubt this method would ever produce 100% accurate results that are identical to a gouraud shader, but it makes for interesting results. The method I am using is pretty slow, as it needs to draw each face four times, three of them being gradient fills. Each vertex’s normal is calculated from the sum of all the faces it is a part of, and that brightness value is used to draw a radial gradient on that face, the center point being the vertex. (Two examples: RGB example and dot example, the circle areas are ‘painted’ on via gradient fill) This can produce some fun effects too when played with.
I had an example of the PseudoGouraudShader last week, but it was off, it looked like alternating faces had different brightness values. Just playing around last night I found the issue, it lies with how I was calculating my normal. When getting the cross product of the vectors, it is better to normalize the result instead of normalizing the vector before. The example below shows the two results and code snippets:
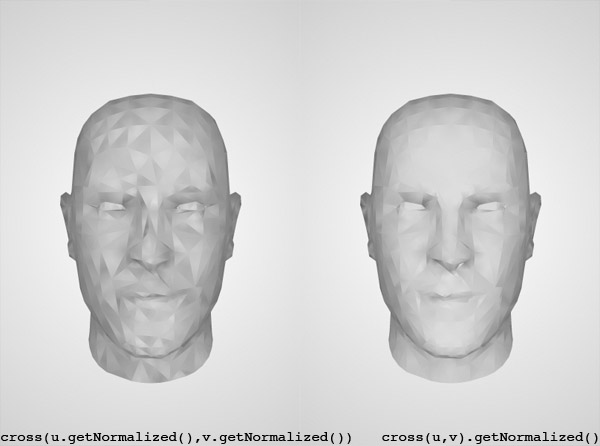
Still not perfect, but I’m not sure how close I can get using this method. I think there might still be some slight errors in the core math, which could be producing the results that look similar to the image on the left (although less intense). You can check out the live demo here.
On a last note, calculating normals and centroid over and over again for rendering can get pretty intense. In the case like this, the same normal gets calculated multiple times a render even though it hasn’t changed (because each vertex needs to get the normal of each face it is connect to). In order to boost speed, I created a caching system. When the normal is calculated, it saves it to a “stale normal” and updates an object (which I called the cached face) that tracks the position of each vertex in the face. Then, the next time the normal is called, if that cached face is not different then the real one, it just uses the stale normal instead of re-calculating.
Lighting and culling can be done in “object space” by transforming your light or camera vectors into the models space. It is a LOT faster to transform a single camera or light vector into your models space than transform possibly hundreds of model normals and vertices into your camera or lighting space.
A good pipeline can be.
1: Inverse transform of camera into object space.
2: Backface and vertex culling.
3: Inverse transform of light into object space.
4: Lighting calculations on visible faces.
5: Transform model into camera space & render.